
9 Easy & Creative Flower Pot Painting Ideas You’ll Love
Ever feel like your flower pots look a little… plain? A splash of paint can turn them into eye-catching decor pieces! Whether you love bright, bold patterns or soft, rustic designs, these easy painting ideas will add personality to your space. No art skills? No problem! Even simple polka dots or an ombre fade can make a huge impact. Plus, these ideas work for both indoor corners and outdoor patios. In this post, you’ll find 9 creative ways to paint your flower pots—from trendy marbled effects to charming farmhouse styles. Grab your brushes and let’s bring those pots to life!
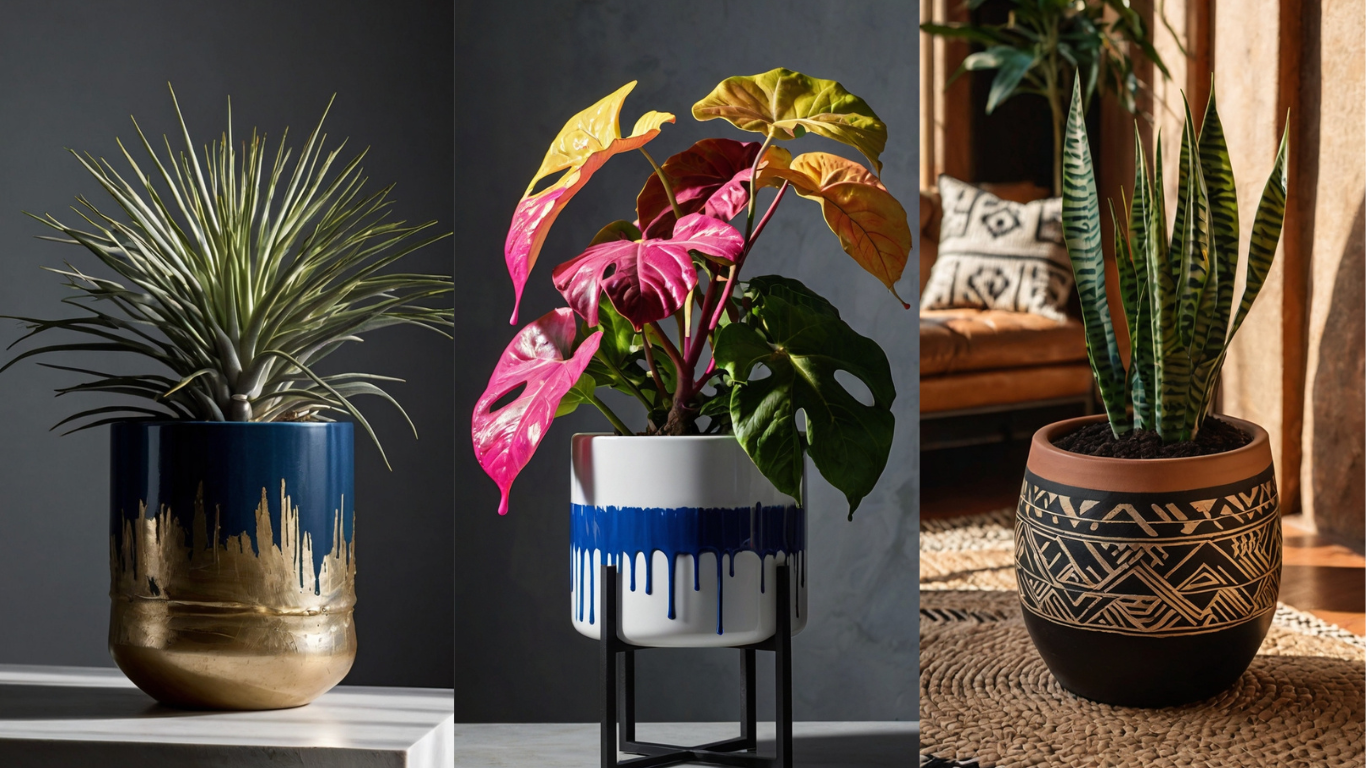
Idea 1: Ombre Gradient Pots
Do you love a modern, effortless vibe? Ombre flower pots are a great way to add depth and style to your space. The key to a flawless gradient is blending wet paint before it dries.
Here’s how to do it:
- Start with two or three shades from the same color family.
- Apply the darkest shade at the bottom, a lighter one in the middle, and the lightest one at the top.
- Use a damp sponge or dry brush to blend where the colors meet.
- If the transition looks harsh, gently dab more paint to soften the effect.
Best Color Combinations for Different Aesthetics
- Chic & Minimalist: Beige fading into white.
- Bold & Playful: Sunset hues—yellow, orange, and pink.
- Cool & Calming: Deep blue transitioning into sky blue.
Idea 2: Cute Polka Dot Flower Pots
If freehand painting feels intimidating, polka dots are the perfect solution! They’re fun, beginner-friendly, and instantly add charm. Best of all, you don’t need special tools—just everyday household items like:
- Cotton swabs
- Pencil erasers
- Bobby pins
Simply dip your chosen tool into paint and dot away!
Fun Color Pairings to Try
- Classic & Elegant: White dots on a pastel pot.
- Bold & Striking: Black and gold dots on a terracotta base.
- Whimsical & Playful: Multi-colored dots in different sizes.
Pro Tip: Lightly trace a grid with a pencil before painting to keep your dots evenly spaced. Once dry, erase any leftover marks, and enjoy your boutique-style flower pot!
Idea 3: Boho-Inspired Tribal Patterns
Want a flower pot that stands out with a bohemian touch? Tribal patterns are the way to go! These designs use simple shapes like triangles, arrows, and zigzags, making them easy to paint—even if you’re not an artist.
Here’s how to do it:
- Base Coat: Start with a solid background color like terracotta, white, or black. Let it dry completely.
- Sketch the Design: Lightly draw your pattern with a pencil. Keep it simple—rows of triangles, chevrons, or dots work beautifully.
- Paint with Precision: Use a thin brush or a paint pen for clean lines. Acrylic paint works best as it dries quickly.
- Add Details: Enhance the design with gold accents or tiny dots for an authentic boho feel.
- Seal the Paint: Once dry, apply a clear sealer to protect it from fading or chipping.
Best Paint Choices for a Long-Lasting Finish
- Acrylic Paint: Dries fast and provides vibrant colors.
- Outdoor Paint: Perfect if your pots will be outside, as it’s weather-resistant.
- Paint Pens: Great for intricate details and clean lines.
Idea 4: Cottagecore Floral Designs
Cottagecore style is all about soft, romantic details, and nothing says vintage charm like hand-painted flowers! If you’re worried about getting the details right, start with simple floral shapes—tiny daisies, wildflowers, or leafy vines.
Try this easy method:
- Choose a Light Base Color: Soft cream, blush pink, or sage green work well.
- Paint Basic Flower Shapes: Use the end of a paintbrush or a dotting tool to create small petals. No need for perfection—imperfect strokes add to the charm!
- Add Leaves & Vines: Use a fine brush to paint delicate stems and leaves in muted green tones.
- Layer for Depth: Add tiny white or yellow dots in the flower centers to make them pop.
How to Use Pastel Shades for a Vintage-Inspired Look
- Blush Pink + White + Gold: Soft and romantic.
- Lavender + Sage Green: Perfect for a dreamy countryside aesthetic.
- Dusty Blue + Cream: A classic vintage-inspired combo.
Idea 5: Drip-Paint Art Pots
Love abstract, artsy designs? Drip-paint pots are vibrant, unpredictable, and so much fun to make!
Here’s an easy way to get the perfect drip effect:
- Choose Your Base Color: Paint the entire pot in a solid shade and let it dry. White, black, or pastel bases work best.
- Prepare the Drip Paint: Thin out acrylic paint with a few drops of water until it flows easily but isn’t too runny.
- Pour or Drip the Paint: Slowly pour the paint over the rim of the pot, letting it naturally drip down the sides. Rotate the pot to get an even design.
- Layer for Depth: Use multiple colors to create a layered, dripping rainbow effect. Let each color dry slightly before adding the next for a more defined look.
Best Color Combos for a Bold Statement
- Neon on Black: Bright pink, blue, and yellow drips pop against a black base.
- Gold on White: A sleek, elegant choice for modern decor.
- Pastels on Terracotta: Soft blues, pinks, and lavenders give a dreamy, watercolor vibe.
Idea 6: Marbled Watercolor Pots
Want a flower pot that looks like a stunning watercolor painting? Marbling with nail polish is a simple trick that creates a swirling, one-of-a-kind effect.
Here’s how to do it:
- Fill a Container with Water: Use a disposable bowl deep enough to submerge your pot.
- Drizzle Nail Polish: Pour a few drops of different nail polish colors onto the water’s surface. Swirl gently with a toothpick for a marbled effect.
- Dip the Pot: Slowly roll your flower pot across the surface to pick up the pattern.
- Let It Dry: Set the pot upside down on wax paper and allow it to dry completely.
Tips for Sealing the Design for Durability
- Apply a clear acrylic spray sealer to protect the marbling from water and fading.
- Use a matte or glossy finish based on your preferred look.
- Avoid scrubbing the pot when watering your plants—marbled designs can be delicate!
7. Modern Abstract Designs
Abstract designs add personality to any space, and the best part? There are no rules! You don’t need perfect shapes—just have fun with colors and brushstrokes.
Try this simple approach:
- Start with a Neutral Base: White, beige, or black works best for making colors pop.
- Use Freehand Brushstrokes: Paint random swirls, waves, or geometric shapes in bold colors.
- Layer & Blend: Let each color dry slightly before adding more to create depth and texture.
- Finish with Details: Use a fine brush to add small accents like lines, dots, or splashes of paint for contrast.
Using Metallics and Bold Colors for a Trendy Touch
- Gold & Navy: Sleek and sophisticated, perfect for modern decor.
- Blush Pink & Copper: A soft yet chic combination.
- Bright Primaries: Red, blue, and yellow for a fun, artsy vibe.
8. Whimsical Galaxy-Themed Pots
Transform a plain flower pot into a stunning piece of the cosmos! The galaxy effect blends deep colors with soft, glowing stars for a magical, out-of-this-world look.
Here’s how to do it:
- Paint the Base: Start with a black or dark blue background to create the night sky.
- Blend in Colors: Use a sponge to dab on purples, pinks, and blues in random patterns. Blend them softly for a nebula-like effect.
- Add Stars: Dip a toothbrush in white paint and flick tiny specks across the pot to mimic distant stars.
- Enhance with Details: Use a fine brush to paint larger stars or add shimmer with metallic paint for extra dimension.
Essential Tools and Paint Colors for a Stellar Finish
- Sponge: Helps blend colors seamlessly.
- Toothbrush: The best tool for splattering realistic stars.
- Colors to Use: Black, navy, purple, pink, and white for depth and contrast.
- Metallic or Glow-in-the-Dark Paint: Adds a shimmering, celestial touch!
Idea 9: Farmhouse-Inspired Whitewashed Pots
If you love the cozy, farmhouse aesthetic, whitewashed flower pots are an easy way to add rustic charm to your space. The faded, weathered look gives them a timeless appeal.
Follow these steps for the perfect whitewashed effect:
- Prepare the Pot: Lightly sand the surface for a more aged texture.
- Mix the Paint: Dilute white acrylic paint with a little water to create a thin, wash-like consistency.
- Apply in Layers: Brush on the paint lightly, then immediately wipe some off with a cloth to let the terracotta peek through.
- Distress for an Aged Look: Once dry, gently sand the edges or randomly scrape off bits of paint for a naturally worn finish.
Best Distressing Techniques for a Farmhouse Vibe
- Sanding: Creates a chipped, aged look.
- Dry Brushing: Lightly drag a dry paintbrush across the surface for subtle streaks.
- Layering Stains: Using a touch of brown or gray paint can enhance the weathered effect.
Final Thoughts
Which of these flower pot painting ideas will you try first? Whether you’re drawn to the dreamy galaxy effect, the rustic farmhouse charm, or the fun of drip-painting, there’s a design for every style. Get creative, experiment with colors, and make each pot uniquely yours!

- 16 Funky Living Room Ideas to Bring Colors, Fun & Personality to Your Space - November 9, 2025
- 12 Small Bathroom Ideas on a Budget That Make Your Space Look Bigger & Stylish - November 6, 2025
- 20 Modern Boho Living Room Ideas That Are Cozy & Absolutely Stunning - November 2, 2025