
Drape Escape: 10 Whimsical DIY Window Treatments to Spark Joy
Whimsical window treatments infuse spaces with personality and joy. This guide explores ten creative DIY ideas to transform your windows into focal points of delight. From playful pom-poms to floating paper airplanes, each project aims to spark joy and elevate your home’s ambiance. These imaginative treatments blend functionality with artistic expression, turning ordinary windows into extraordinary design elements. Embrace the unexpected and let your creativity shine through these fun, approachable projects.
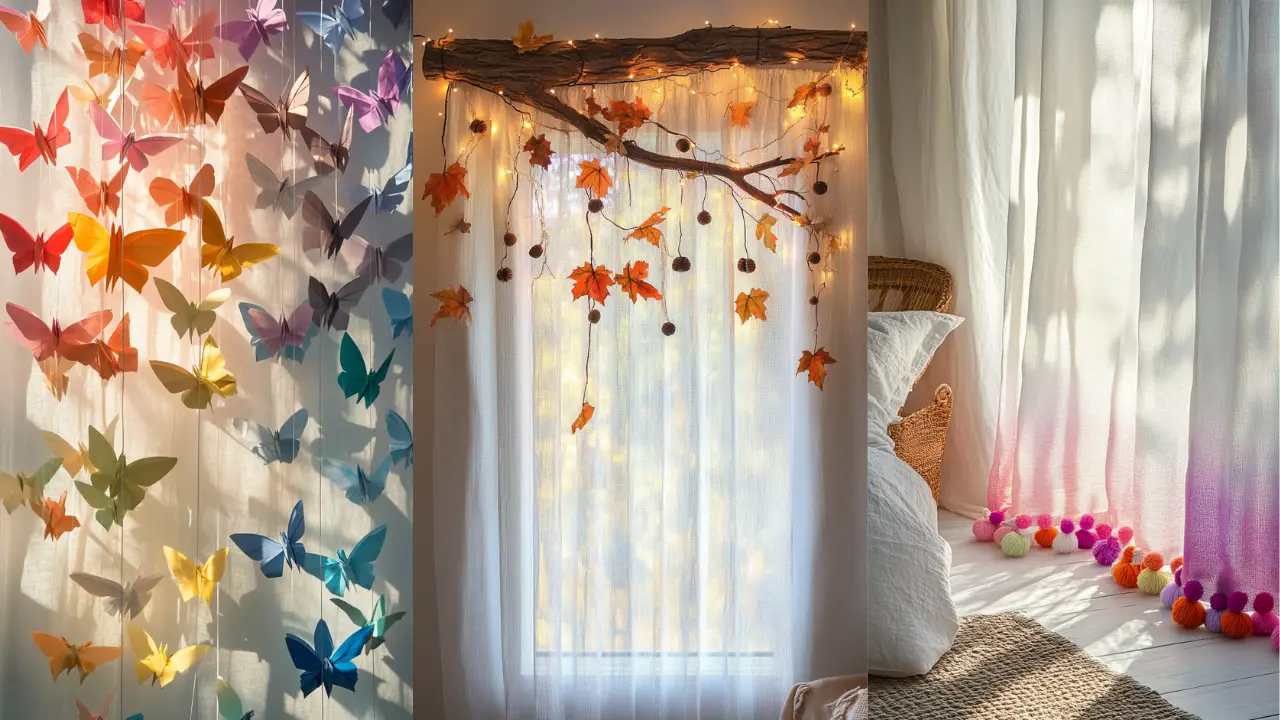
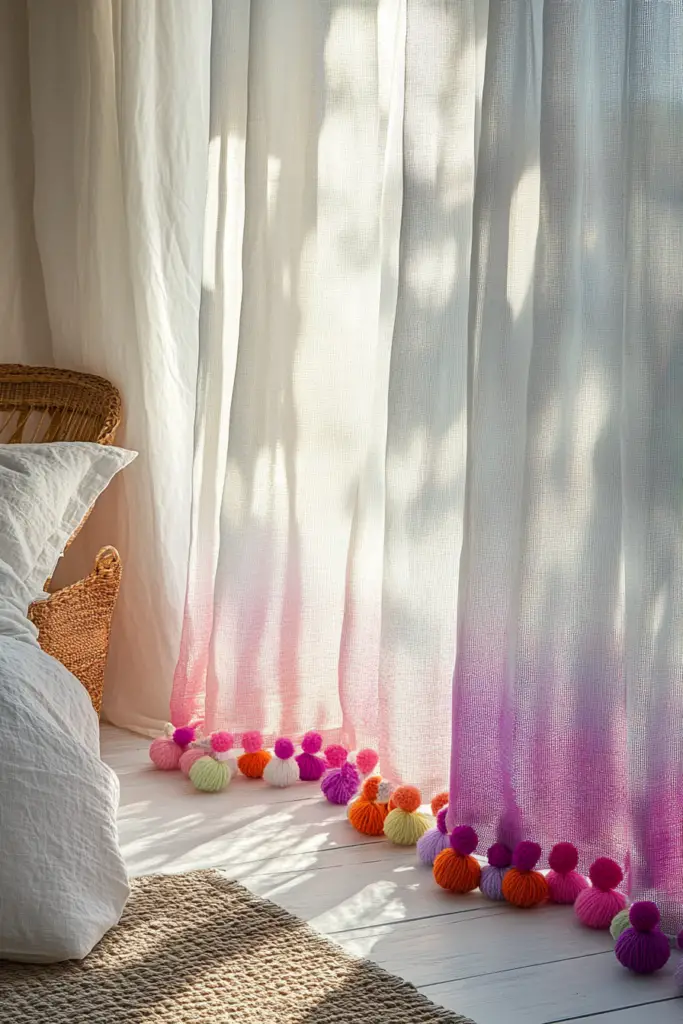
1. Playful Pom-Pom Curtain Borders
Add a burst of whimsy to your windows with cheerful pom-pom borders. This simple upgrade transforms plain curtains into eye-catching focal points. Pom-poms inject fun and texture into any room’s decor.
- Making pom-poms: Use a pom-pom maker or cardboard template for consistent sizes. Choose yarn in various thicknesses for diverse textures. Trim pom-poms evenly for a polished look.
- Attaching to existing curtains: Sew pom-poms along the curtain edge for durability. Use fabric glue for a no-sew alternative. Space pom-poms evenly for a balanced appearance.
- Color combination ideas: Match pom-poms to your room’s accent colors. Create an ombre effect with graduated shades. Mix complementary colors for a vibrant, playful look. Use neutral pom-poms on colorful curtains for subtle texture. Experiment with multicolored pom-poms for a confetti-like border.
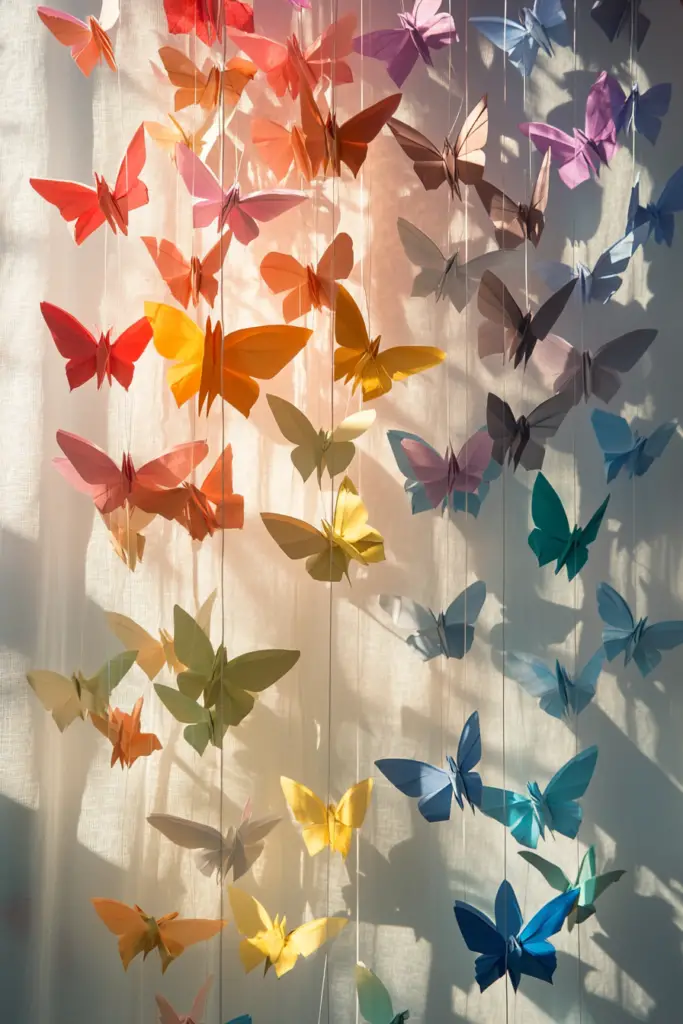
2. Origami Butterfly Curtain
Transform your window into a whimsical butterfly haven. This delicate curtain creates a magical atmosphere in any room. Origami butterflies offer a unique blend of art and function.
- Folding paper butterflies: Choose lightweight, colorful paper for vibrant butterflies. Follow simple origami patterns for consistent shapes. Vary butterfly sizes for visual interest.
- Creating a cascading effect: Attach butterflies to clear fishing line at different lengths—secure lines to a curtain rod or wooden dowel. Arrange butterflies in a gradient pattern for depth.
- Preserving and maintaining: Spray butterflies with a clear sealant for longevity. Dust gently with a soft brush to maintain colors. Replace damaged butterflies to keep the curtain looking fresh. Store carefully when not in use to prevent creasing.
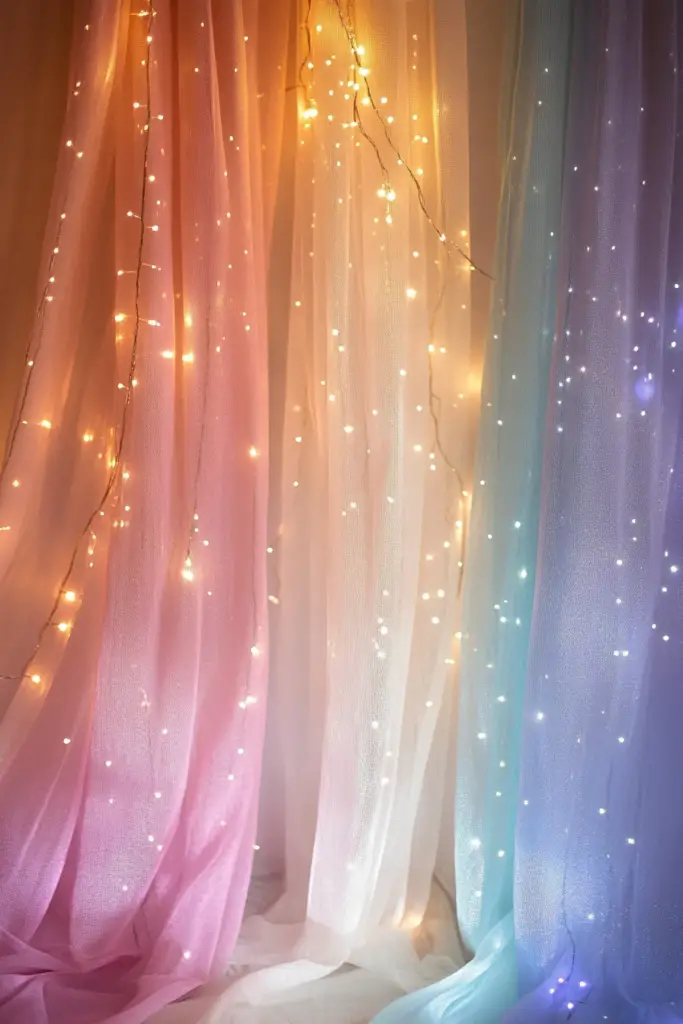
3. Fairy Light Tulle Dream Curtains
Create an enchanting atmosphere with illuminated tulle curtains. This magical window treatment transforms rooms into dreamy spaces. Fairy lights add a soft, sparkling glow to sheer fabric.
- Layering tulle: Choose tulle in complementary colors for depth. Cut tulle into panels slightly wider than your window. Layer multiple sheets for a fuller appearance.
- Incorporating battery-operated fairy lights: Select warm white lights for a cozy ambiance. Weave lights between tulle layers evenly. Secure battery packs discreetly at the top of the curtain.
- Safety considerations: Use only LED lights to prevent overheating. Keep battery packs away from moisture. Inspect wires regularly for wear. Turn off lights when leaving the room. Consider timer-enabled lights for automatic shut-off.
4. Painted Rainbow Roller Shade
Transform a plain roller shade into a vibrant rainbow masterpiece. This colorful project adds cheer to any room. Custom-painted shades offer a unique alternative to store-bought options.
- Choosing paints: Select fabric paints for flexibility and durability. Opt for high-pigment colors for a bold rainbow effect. Consider metallic or pearlescent paints for added dimension.
- Creating the rainbow effect: Measure and mark equal sections on the shade. Apply colors in traditional rainbow order for a classic look. Use a sponge or brush for a smooth, even application.
- Sealing for durability: Allow paint to dry completely before sealing. Apply a clear fabric medium for protection. Heat-set the paint according to product instructions. Test the shade’s rolling mechanism to ensure smooth operation.

5. Hanging Terrarium Window Display
Create a living window treatment with suspended terrariums. This unique display brings nature indoors while filtering light. Hanging terrariums offer a fresh twist on traditional window decor.
- Selecting plants and containers: Choose low-maintenance succulents or air plants. Opt for clear glass containers in various shapes. Select lightweight options for safe hanging.
- Arranging the display: Hang containers at staggered heights for visual interest. Use sturdy hooks or a rod system for secure placement. Combine different plant types for textural variety.
- Care and maintenance tips: Water plants sparingly to prevent overwatering. Rotate terrariums occasionally for even light exposure. Clean glass regularly to maintain clarity. Replace any struggling plants promptly. Adjust hanging height as plants grow.
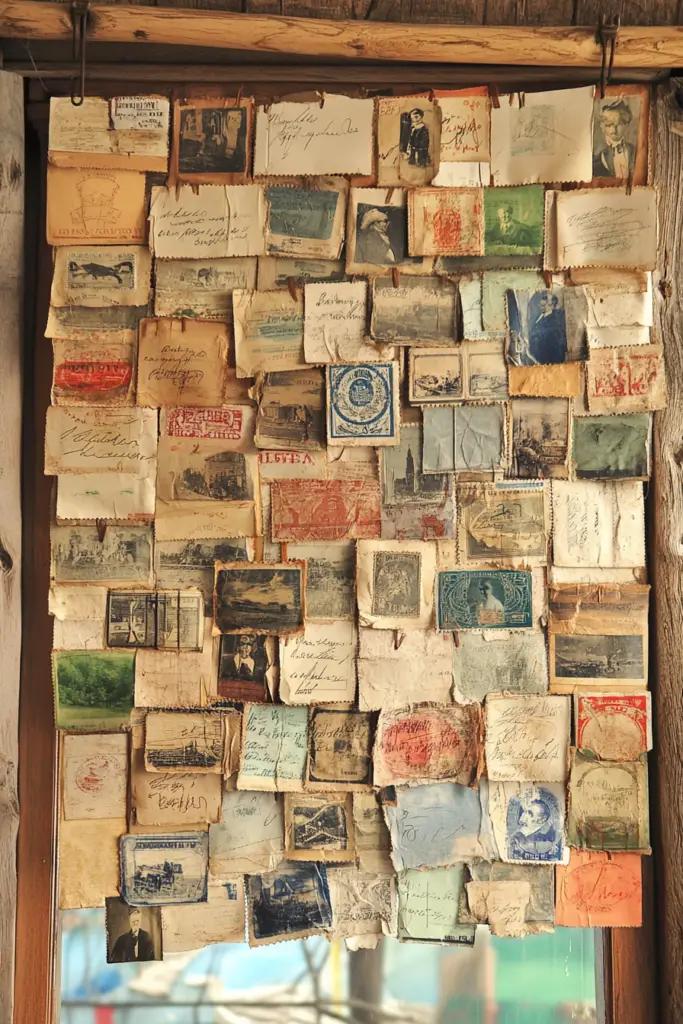
6. Vintage Postcard Valance
Transform old postcards into a unique window valance. This project showcases travel memories or vintage finds. Postcard valances add character and nostalgia to any room.
- Sourcing postcards: Hunt for postcards at flea markets or online auctions. Choose cards with cohesive themes or color schemes. Mix vintage and modern postcards for eclectic charm.
- Creating the valance structure: Measure your window for proper valance sizing. Attach postcards to a fabric backing using photo corners. Sew or glue the backing to a curtain rod pocket.
- Preserving the postcards: Apply a UV-resistant clear sealant to protect images. Avoid direct sunlight to prevent fading. Handle the valance gently during installation and cleaning. Replace damaged postcards as needed to maintain appearance.
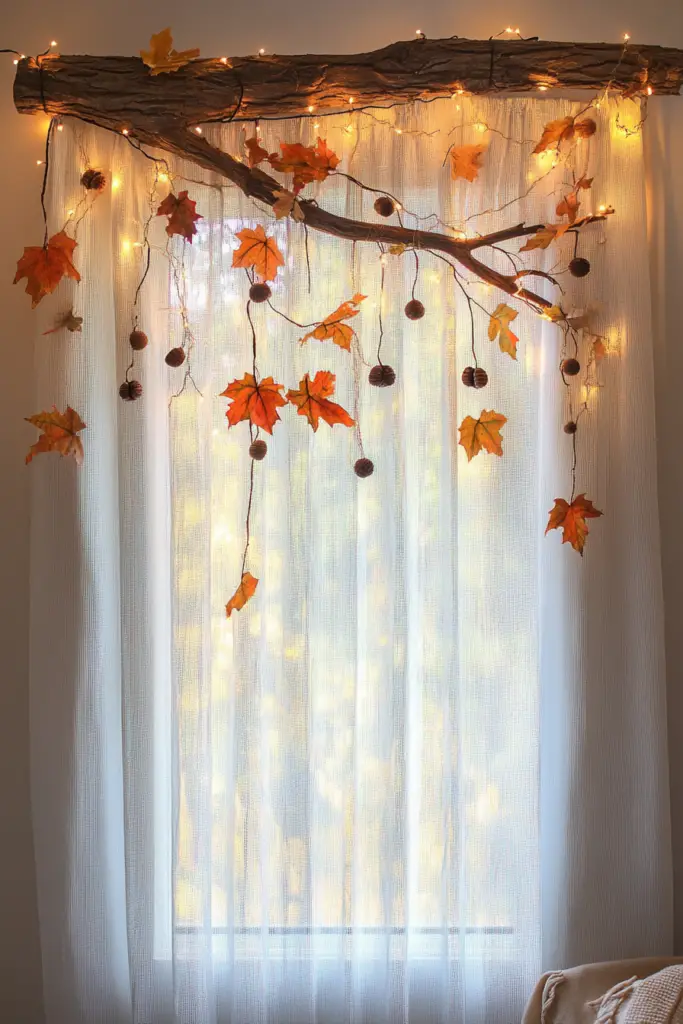
7. Seasonal Branch and Bauble Curtain Rod
Transform your window with a nature-inspired curtain rod. This versatile design adapts to changing seasons effortlessly. Branch curtain rods bring organic charm to any room.
- Finding and preparing branches: Select sturdy, straight branches from your yard or local park. Sand rough spots for a smooth finish. Apply a clear sealant to preserve the wood’s natural beauty.
- Attaching decorative elements: Hang lightweight ornaments or baubles from the branch. Use ribbon or twine to secure decorations. Incorporate fairy lights for a magical evening ambiance.
- Changing decor with seasons: Swap ornaments for fresh blooms in spring. Add seashells and starfish for a summer coastal vibe. Introduce colorful leaves and acorns for autumn flair. Transition to pinecones and snowflakes for winter wonder.
8. Kaleidoscope Stained Glass Effect
Transform your window into a stunning kaleidoscope of colors. This faux stained glass technique creates a mesmerizing light display. Colorful films offer privacy while maintaining natural brightness.
- Using transparent colored films: Select adhesive window films in various hues. Opt for high-quality films for vivid color projection. Mix warm and cool tones for a balanced palette.
- Creating geometric patterns: Sketch your design on paper before applying it to the window. Use a ruler and craft knife for precise cuts. Experiment with triangles, diamonds, or hexagons for diverse effects.
- Application and removal process: Clean the window thoroughly before applying films. Smooth out air bubbles with a squeegee for a flawless finish. Peel off films gently when changing designs. Remove adhesive residue with soapy water and a soft cloth.

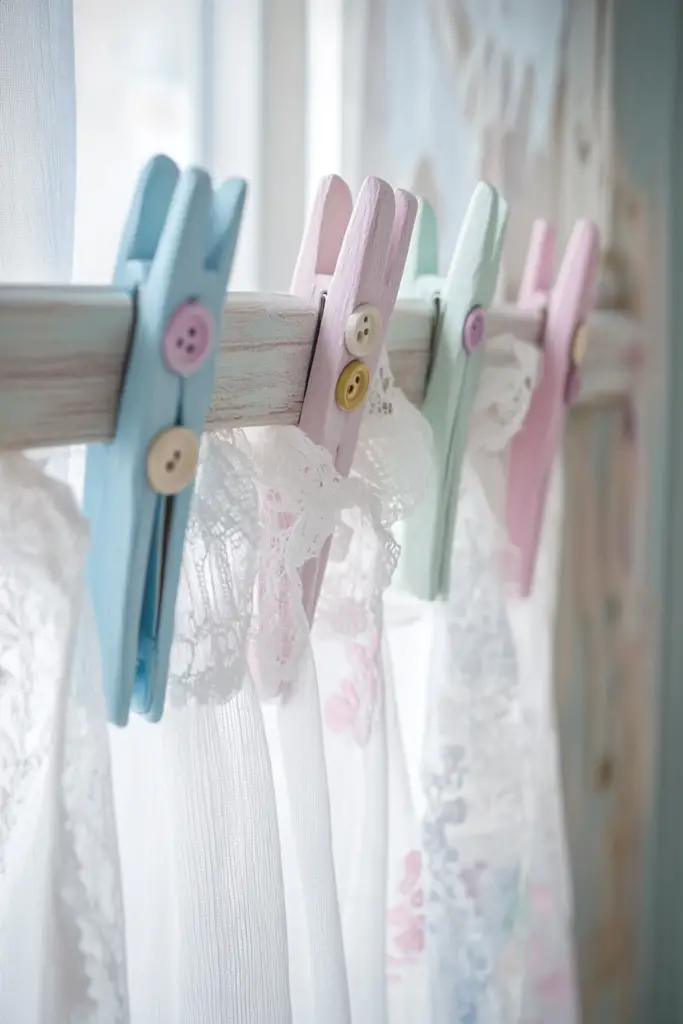
9. Whimsical Clothespin Curtain Clips
Transform ordinary clothespins into charming curtain accessories. These decorative clips add playful flair to window treatments. Customized clothespins offer a budget-friendly way to refresh your curtains.
- Decorating clothespins: Paint clothespins in coordinating colors with acrylic paints. Use washi tape for quick, patterned designs. Apply glitter or metallic paint for a touch of sparkle.
- Attaching embellishments: Glue small buttons or beads for added texture. Wrap twine or ribbon around the clips for a rustic look. Attach miniature wooden shapes for themed designs.
- Using lightweight curtains: Space clothespins evenly along the curtain rod. Clip sheer fabrics gently to avoid damage. Adjust pins to create soft gathers or pleats. Mix and match decorated clips for an eclectic style.
10. Cloud and Raindrop Felt Curtain
Create a whimsical weather scene for your window. This felt curtain brings a touch of sky-inspired magic indoors. Fluffy clouds and dangling raindrops add texture and movement to your space.
- Cutting cloud and raindrop shapes: Use white felt for soft, billowy clouds. Cut various sizes of cloud shapes for dimension. Create teardrop shapes in blue felt for raindrops.
- Arranging the design: Layer cloud shapes for a fuller appearance. Vary raindrop lengths for visual interest. Plan the layout on a flat surface before attaching.
- Attaching to a base curtain: Sew or use fabric glue to secure clouds to a sheer curtain. Hang raindrops from clouds using clear thread. Ensure all elements are firmly attached for durability.

Conclusion
These whimsical DIY window treatments transform ordinary spaces into joyful sanctuaries.
From pom-pom borders to origami butterflies, each idea sparks creativity and personal expression.
Use these projects as inspiration for your unique vision.
Experiment with colors, materials, and designs to reflect your personality.
The most delightful spaces often arise from unexpected ideas.
Let your imagination soar as you craft window treatments that truly spark joy in your home.

- 16 Funky Living Room Ideas to Bring Colors, Fun & Personality to Your Space - November 9, 2025
- 12 Small Bathroom Ideas on a Budget That Make Your Space Look Bigger & Stylish - November 6, 2025
- 20 Modern Boho Living Room Ideas That Are Cozy & Absolutely Stunning - November 2, 2025